Wet Basement Fixes

Planning guide

Basement Waterproofing Checklist

A waterproofing checklist helps you compare estimates by evidence, scope, and exclusions instead of product names. Use it before calling contractors and again before approving work.

How to use this page

  • Start with the symptom or decision closest to your situation.
  • Compare repair options before choosing a contractor quote.
  • Check cost assumptions, safety boundaries, and related guides.
  • Request an inspection when water, odor, humidity, insulation, or wood concerns are active.

Quick answer

Start with safety, timing, and the first wet point

A basement waterproofing checklist should cover five areas: the water pattern, exterior drainage, sump and discharge, finished-material risk, and the written estimate. The goal is not to diagnose the basement yourself. The goal is to make sure every contractor is responding to the same evidence.

Before calling, gather photos of the first wet point, the outside wall, downspouts, gutters, grading, window wells, sump basin, discharge line, stains, cracks, and any damaged materials. During the estimate, ask what source is being addressed, what method is recommended, what is excluded, and how water will move after the work is complete.

A checklist also protects against shallow quotes. A waterproofing estimate that does not name water entry, drain length, pump details, discharge route, restoration, warranty exclusions, and maintenance needs may be hard to compare with a more complete quote.

Last reviewed: August 2, 2026
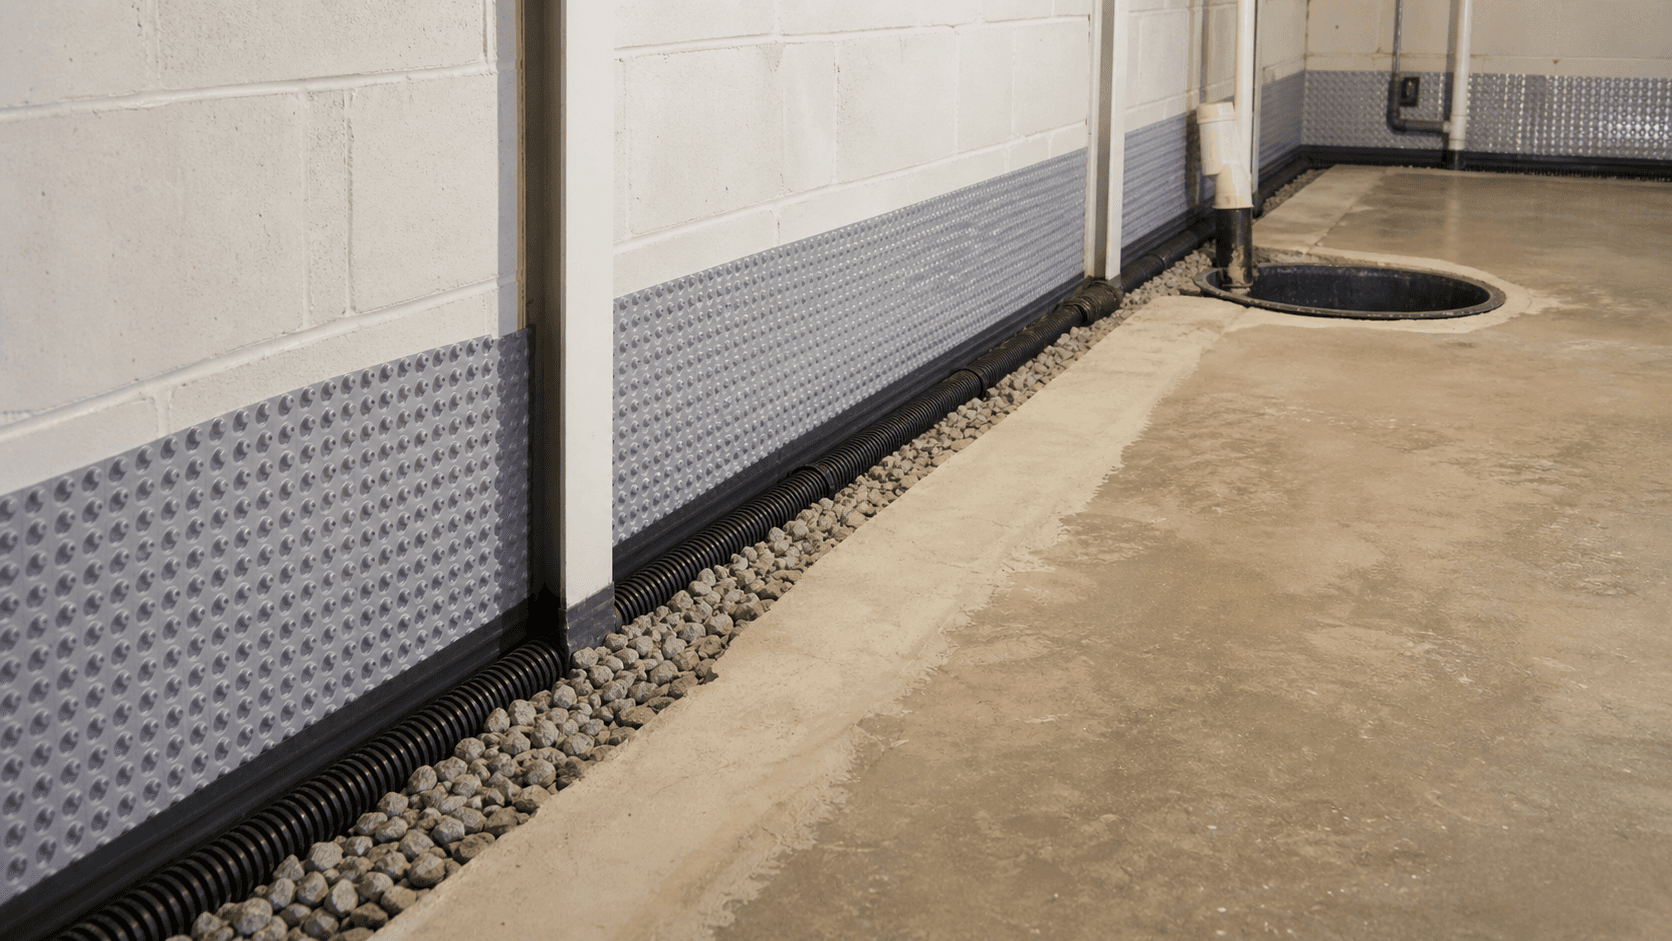
Interior basement drainage system installation with gravel and sump connection
A good checklist connects symptoms to scope: collection path, sump system, discharge, disturbed materials, and maintenance.

Clue table

What common observations may mean

ObservationPossible meaningUseful next step

Interior water pattern

The first wet point helps determine whether the issue is wall, floor, perimeter, sump, or window related.

Photograph and label wet spots before cleanup.

Exterior drainage

Gutters, downspouts, grading, patios, and window wells may be adding water to the foundation.

Walk the matching outside wall and document water routes.

Sump and discharge

Pump failure, poor discharge, or missing collection paths can cause repeated water.

Record pump age, basin behavior, backup status, and discharge location.

Finished basement materials

Drywall, flooring, trim, insulation, and storage can hide water and raise restoration cost.

Ask what must be removed, protected, replaced, or excluded.

Written scope

Different estimates may be solving different problems.

Ask each contractor to explain source, method, limits, price drivers, and warranty.

Field guide

How to think through basement water

A basement water guide should begin with observation, not demolition. The safest first step is to identify the first wet point, the timing, the weather conditions, and the surrounding clues before anyone starts opening walls, cutting concrete, or buying a repair product. A small note made during the storm can prevent a much more expensive guess later.

The most useful pattern is repeatability. Water that appears in the same wall crack after every hard rain points to a different repair conversation than water that appears once after a power outage, under a water heater, near a window well, or across a whole floor. The more repeatable the pattern, the easier it is to compare repair options.

Exterior clues belong in every guide because basement water often starts outside. Roof water, short downspouts, clogged gutters, low soil beside the foundation, settled patios, window wells, and discharge lines can all send water toward the same basement wall. NC State Extension guidance emphasizes clean, maintained gutters and downspout water carried away from the home.

Professional boundaries matter. Homeowners can document water, move dry belongings, check visible drainage clues, and run a sump test from a safe dry location. They should not stand in water near electrical equipment, handle contaminated water without protection, diagnose structural movement from photos alone, or treat mold and health questions as simple waterproofing decisions.

Step-by-step

Work through the guide in order

1

Build a water history

Write down when water first appeared, how often it returns, which storms caused it, whether the basement dried between events, whether power failed, and whether the sump pump ran. A simple history turns a vague problem into a pattern.

2

Map the basement

Sketch the basement walls and mark the first wet point, cracks, stains, sump basin, floor drains, window wells, utilities, finished rooms, and stored items. A sketch makes estimates easier to compare because each contractor can point to the same places.

3

Check outside water management

Clean gutters, inspect downspouts, check soil slope, look for settled beds, and note where roof water discharges. NC State Extension discourages splash blocks as a primary long-term solution because they release water close to the home.

4

Review sump reliability

A sump system checklist should include pump age, float movement, basin debris, lid, check valve, discharge location, alarm, backup pump, battery backup, and whether water actually reaches the basin during rain.

5

Compare systems by function

Interior drains collect water after it reaches the basement perimeter. Exterior waterproofing reduces or blocks water from outside. Crack repair seals a specific path. A sump pump removes collected water. Paint treats a surface. Match the method to the function.

6

Read exclusions before price

Ask whether cleanup, mold remediation, drywall, flooring, electrical work, plumbing, permits, landscaping, patios, utility work, structural repair, and warranty transfer are included or excluded.

Safety and evidence

Protect people first, then protect the record

Safety boundaries

  • Do not use a checklist as permission to enter unsafe water or touch wet electrical equipment.
  • Do not treat mold-like staining as only a cosmetic problem when wet materials remain.
  • Do not ask a waterproofing contractor to diagnose health symptoms or mold species.
  • Do not approve structural-wall work based only on a waterproofing checklist.
  • Do not finish walls or flooring until the water source has been tested through repeat rain.

What to document

  • Photos of wet areas before cleanup and after drying.
  • Photos of gutters, downspouts, grading, patios, window wells, and discharge lines.
  • Sump pump model, age if known, backup status, alarm status, and discharge route.
  • List of finished materials or stored items that may need protection or removal.
  • Copies of all estimates with line items, exclusions, warranties, and maintenance requirements.

Next-step planning

Turn observations into the right kind of action

After the first observation pass, sort the problem into one of four buckets: urgent safety issue, cleanup and drying issue, diagnosis issue, or repair planning issue. A flooded basement with electrical risk belongs in the first bucket. Wet drywall and carpet belong in cleanup and drying. A repeating wet line after rain belongs in diagnosis. Comparing interior drainage, exterior waterproofing, sump replacement, or crack repair belongs in repair planning.

The order matters because basement water projects can get expensive when steps are skipped. If wet materials remain, a waterproofing estimate may not address odor or indoor-air concerns. If the water source is not identified, a contractor may price a system that manages symptoms but misses exterior water. If discharge is unclear, a new pump or drain can send water right back toward the foundation.

A useful guide note becomes a better estimate when it includes location, timing, weather, water depth, first wet point, drying time, exterior conditions, sump behavior, and what changed after the last repair or storm. These details help separate a maintenance issue from a system design issue.

For homeowners comparing options, the next step should be proportional to risk. A small damp patch that appears once may justify monitoring and exterior maintenance. A repeat leak near finished walls, a failed pump, or standing water after storms should move toward inspection. Electrical concerns, sewage, gas odor, structural movement, or contaminated water should skip routine quote shopping and move directly to the appropriate specialist or emergency help.

Before the estimate

Make the inspection easier to compare later

Before an inspection, clear safe access to the wet wall, sump basin, discharge line, exterior wall, and any window well involved. Do not move heavy items through water or disturb materials that may be contaminated. The goal is to let the estimator see the evidence without creating a new safety problem.

During the inspection, ask the contractor to describe the repair in plain sequence: where water starts, where it enters, where the system collects it, where it discharges, what happens during power loss, and what maintenance the homeowner must perform. A clear sequence is often easier to trust than a polished sales label.

After the inspection, compare scopes line by line. One estimate may be only a pump replacement. Another may include perimeter drainage, a basin, battery backup, discharge rerouting, concrete repair, and finished-material removal. Those are not the same job. The guide notes should help you compare what each proposal is actually solving.

If the basement will be finished later, ask for a higher standard of proof. That can mean storm testing, humidity monitoring, backup pump planning, alarms, better discharge, and written exclusions for materials behind walls. Finishing over uncertainty usually costs more than pausing to verify the water path.

Estimate prep

Questions to ask before choosing a repair

  • What water source and entry path does this estimate address?
  • What evidence supports the recommended system?
  • What does the system do during a heavy rain and during a power outage?
  • Where does collected water discharge?
  • What finished materials, exterior surfaces, utilities, or landscaping will be disturbed?
  • What maintenance is required to keep the warranty valid?
  • What happens if water appears from another area later?

Local notes

Raleigh, Durham, and Fayetteville considerations

Raleigh homeowners should connect guide observations to lot drainage, roof-water discharge, finished basement use, permit questions, and whether a sump or discharge line needs electrical or plumbing coordination.

Durham guidance should stay property-specific until the city pages are expanded. Older additions, tight lots, finished spaces, and exterior access limits can matter more than broad city assumptions.

Fayetteville homeowners should put storm readiness high on the list when a basement has repeated rain-related water. Pump backup, alarms, discharge location, and cleanup exclusions deserve early attention.

For any local estimate, ask the contractor to describe what happens during a heavy rain, where water is expected to move, what part of the system needs maintenance, and what is excluded if water returns.

Avoid these

Common mistakes that make the next estimate weaker

Comparing a pump-only quote with a full drain-and-pump quote as if they are the same scope.
Forgetting to ask who handles electrical, plumbing, permit, or inspection questions.
Accepting a warranty length without reading exclusions.
Ignoring finished-material restoration costs.
Letting a product name replace a water-path explanation.

After the first step

Monitor the next rain before closing the case

After the first cleanup, repair, or maintenance step, monitor the basement through at least one meaningful rain. Check the original wet point, the sump basin, the discharge location, the outside wall, the humidity level, and any finished materials that were close to the water. A basement can look dry on the surface while damp materials or hidden wall cavities still need attention.

Keep a simple log for the next few storms: date, rain intensity, first wet point, pump activity, discharge behavior, odor, humidity, and whether water returned. This log helps decide whether a small maintenance fix worked, whether a larger drainage system is justified, or whether a prior repair needs follow-up under warranty. It also gives every estimator the same timeline, which makes later recommendations easier to compare.

Related pages

Where to go next

FAQs

Common guide questions

What should be on a basement waterproofing checklist?

Include water timing, first wet point, exterior drainage, sump behavior, cracks, stains, finished materials, photos, estimate line items, exclusions, warranty, and maintenance requirements.

Should I clean gutters before calling a waterproofing contractor?

If it is safe, yes. Gutters and downspouts are part of the water story. You can still call a contractor, but basic exterior water clues help the estimate.

How many waterproofing estimates should I get?

More than one estimate can help when the scope is unclear. Compare what each quote includes and excludes, not only the total price.

Can I use this checklist for a finished basement?

Yes, but finished basements need extra care. Ask what must be opened, removed, protected, dried, replaced, or excluded before approving work.

Sources

References used for this guide

This guide uses public safety, mold, moisture, and drainage references. It is educational and does not replace a local inspection, emergency response, electrician, plumber, mold professional, structural professional, or insurance guidance when those are needed.